In summary:
- True pre-writing readiness starts with strengthening hand muscles, not tracing letters.
- Everyday items like Cheerios, clothespins, and play-doh are powerful tools for development.
- Focus on a progression: from large, whole-hand movements to precise finger control.
- The type of tool matters; broken crayons, for example, naturally encourage a proper grip better than markers.
- Purposeful play is the most effective and enjoyable way to prepare your child for handwriting success.
Watching your preschooler struggle to hold a crayon can spark a flicker of worry. Is their handwriting going to be a problem? The instinct for many parents is to reach for tracing workbooks, believing that practice makes perfect. But this common approach often skips the most crucial step, leading to frustration for both child and parent. The pages of neatly dotted lines assume a level of hand strength and control that many young children simply haven’t developed yet.
The secret to preparing a child for writing has very little to do with a pencil at all. It’s about building the foundational “hand muscle architecture” from the ground up. Before a child can form an ‘A’, their hand needs to master a sequence of complex movements: the strength to squeeze, the dexterity to pinch, and the coordination to manipulate small objects. This process is a developmental journey, one that should be filled with play, not pressure.
This guide will shift your focus from the final product (perfect letters) to the essential process (building strong, capable hands). We will explore why picking up a Cheerio is a more significant milestone than you think, how to turn household items into a hand-strengthening gym, and why snapping a crayon in half might be the best thing you can do for your child’s future pencil grip. Get ready to discover how playful, purposeful activities create the foundation for confident and effortless writing down the road.
To help you navigate these crucial developmental stages, this article is structured to guide you through a series of playful, effective strategies. Explore the table of contents below to jump to the activities that spark your interest or follow along to build a complete pre-writing toolkit.
Summary: Beyond the Pencil: Fun Fine Motor Activities to Build Pre-Writing Skills
- Why Picking Up Cheerios Is the First Step to Holding a Pen?
- How to Use Tongs and Tweezers to Strengthen Hand Muscles?
- Crayons vs Markers: Which Tool Forces Better Finger Positioning?
- The Tracing Workbook Error That Frustrates Preschoolers
- How to Teach Scissor Safety to a 3-Year-Old Without Fear?
- How to Teach “Milk” and “More” to Reduce Frustration Before Speech?
- Magnetic Tiles vs Wooden Blocks: Which Offers More Creative Possibilities?
- Toy Rotation: How to Foster Deep Play With Fewer Items
Why Picking Up Cheerios Is the First Step to Holding a Pen?
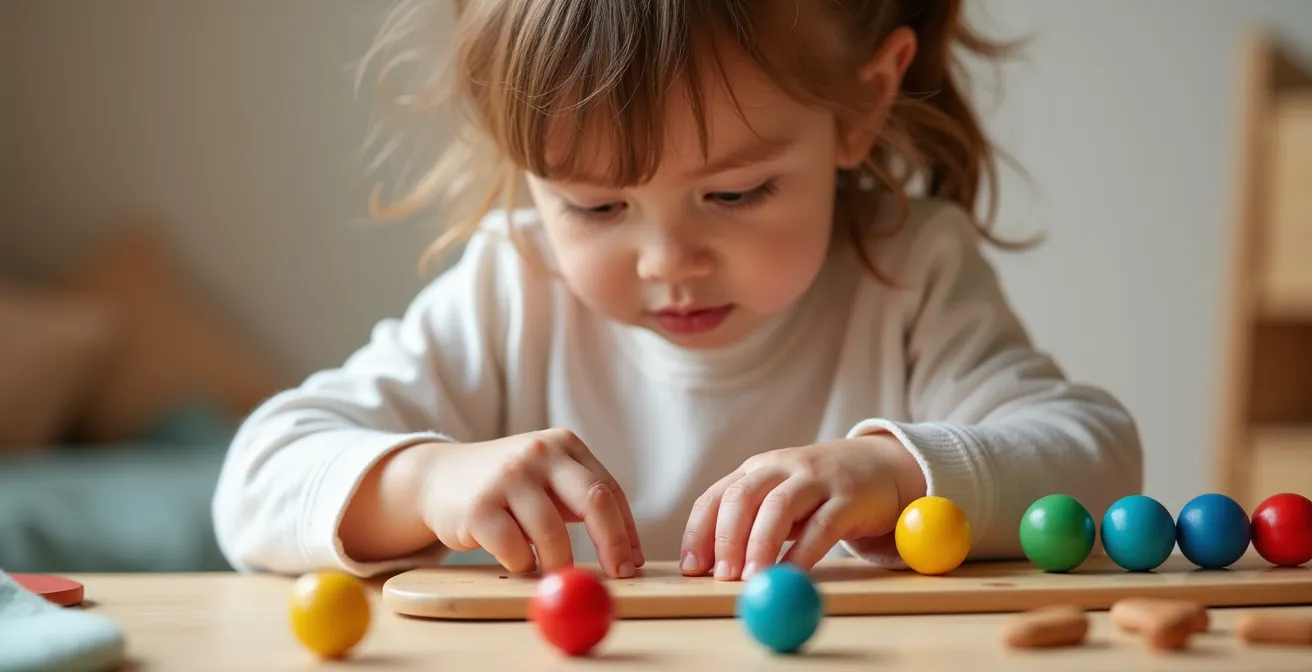
Before a child can master the tripod grip required for writing, they must first conquer a fundamental motor milestone: the pincer grasp. This is the precise coordination of the thumb and index finger to pick up small objects. It seems simple, but it represents a huge leap in brain development and hand dexterity. Activities like picking up small snacks—Cheerios, puffs, or raisins—are not just about snack time; they are targeted practice for isolating those two crucial fingers.
The journey begins with a “raking” grasp around 6 months, where the whole hand is used to pull objects closer. Gradually, this refines into a more deliberate, albeit clumsy, whole-finger grasp. The magic happens when a child can finally isolate their thumb and forefinger. According to pediatric experts, about 50% of babies develop a pincer grasp by 10-12 months, laying the literal groundwork for holding a pencil years later. Each Cheerio successfully captured and brought to the mouth strengthens the tiny intrinsic muscles in the hand that provide stability and stamina for writing.
You can encourage this progression by making it a game. Hide small puffs in an ice cube tray to encourage precision, or have your child peel stickers off a sheet. These playful challenges require the same finger isolation and control needed to manipulate a pen. By focusing on these early, foundational skills, you are building the “hand muscle architecture” that makes holding a writing tool feel natural and effortless later on.
How to Use Tongs and Tweezers to Strengthen Hand Muscles?
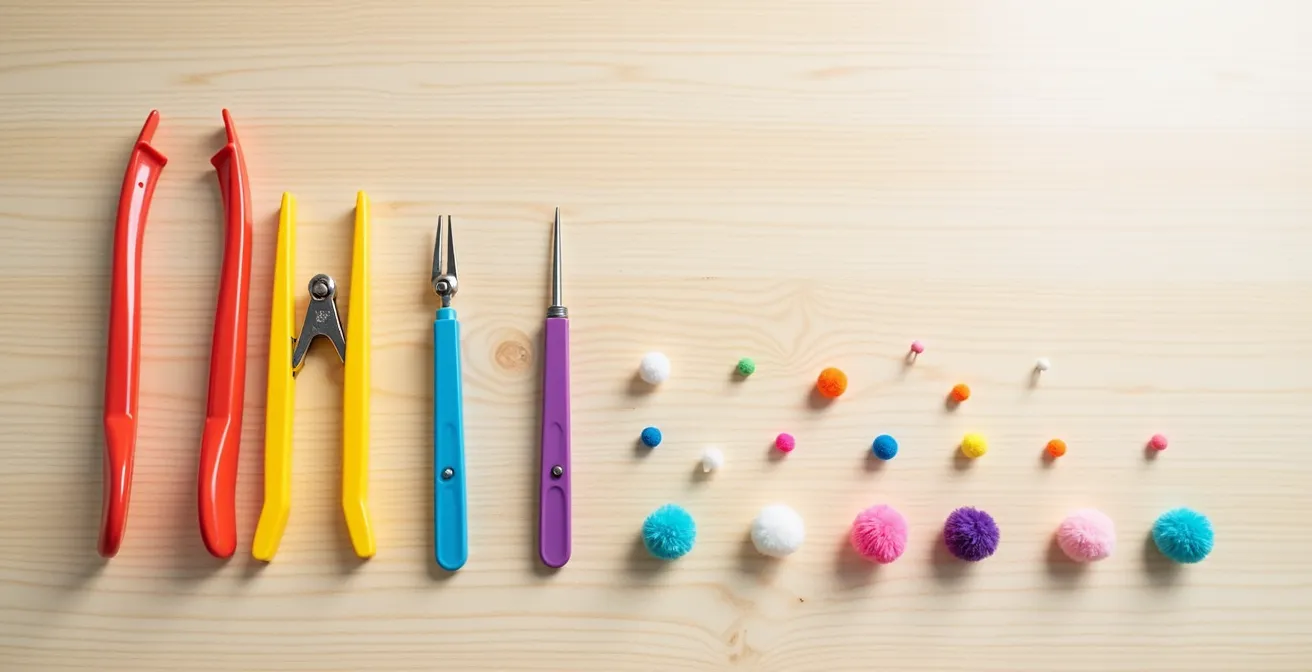
Once the pincer grasp is emerging, the next step is to build hand strength and endurance. Tongs, tweezers, and clothespins are fantastic for this because they require the hand to perform a repetitive open-and-close motion, directly strengthening the palmar arches and the muscles needed for cutting with scissors and squeezing a glue bottle. This is where you can introduce a “tool ladder” approach, starting with larger tools that require less precision and gradually moving to smaller ones.
This paragraph introduces the comparative table of fine motor tools. As shown in the following fine motor tool progression chart, the key is to match the tool to your child’s developmental stage to ensure the activity is challenging but not frustrating.
| Tool Type | Age Range | Target Skill | Activity Example |
|---|---|---|---|
| Large Salad Tongs | 2-3 years | Gross grasp control | Transfer stuffed animals |
| Clothespins | 3-4 years | Pincer strength | Hang artwork on string |
| Kitchen Tongs | 3-5 years | Bilateral coordination | Sort pom-poms by color |
| Plastic Tweezers | 4-5 years | Precision grasp | Rice transfer races |
| Metal Tweezers | 5+ years | Fine precision | Bead placement activities |
To make this fun, turn it into a game. Use large salad tongs to “rescue” stuffed animals from one bin to another. Use kitchen tongs to sort colorful pom-poms into an egg carton. As their control improves, introduce clothespins for “pinching” games or plastic tweezers for delicate operations like moving beads or beans. This progression is not just about strength; it’s about refining control.
Case Study: The Tool Ladder Progression Method
Therapists at the NAPA Center often use a progressive tool approach to make skill-building fun. They start with activities like clipping clothespins onto the pages of a book to create “legs” for characters. This playful task strengthens the hand for future scissor use. They then advance the skill by having children attach clothespins to their own clothing without using a mirror, which simultaneously builds pincer strength and body awareness—a crucial combination for independent dressing.
As you can see, the variety of tools allows for a natural increase in difficulty. By moving from large, easy-to-squeeze tongs to tiny, precise tweezers, you are taking your child on a systematic journey of motor skill refinement. This targeted play builds the exact muscles and coordination they will later rely on for hours of drawing, writing, and creating.
Crayons vs Markers: Which Tool Forces Better Finger Positioning?
When it comes to drawing tools, not all are created equal for developing a proper pencil grip. Markers, with their easy ink flow and large barrels, are often a favorite for young children. However, they are a poor choice for grip training. Because they require almost no pressure to make a mark, a child can hold them in any way—often in a full fist—and still get a result. This reinforces an immature grasp rather than encouraging a more refined one.
Crayons, on the other hand, are a superior tool for building hand strength. They require the user to apply consistent pressure to transfer color to paper, which actively engages and strengthens finger and hand muscles. For an even greater benefit, an occupational therapist’s favorite trick is to use small, broken crayon pieces. This simple modification is surprisingly effective because it makes it physically awkward to hold the crayon in a fist. Instead, a child is naturally guided into a tripod (three-finger) or quadrupod (four-finger) grasp—the very grips they will need for writing.
As noted by early childhood experts, this small change can make a big difference. In the guide “Pre-Writing Activities for Preschoolers,” the author gives a simple but powerful piece of advice:
Break crayons in half so it’s easier to write with
– Teaching Mama, Pre-Writing Activities for Preschoolers
The progression should be intentional. Start toddlers with egg-shaped or rock crayons that fit into their palm (palmar grasp). As they grow, introduce those small, broken crayon pieces to force a finger-led grip. Finally, move to short, triangular crayons or golf pencils that provide tactile cues for finger placement. Reserve markers for fun, creative expression, but make crayons and smaller pencils the primary tools for skill-building work.
The Tracing Workbook Error That Frustrates Preschoolers
The impulse to buy tracing workbooks is understandable, but it’s often a developmental mismatch. These books frequently expect a level of precision that a preschooler’s hands and eyes are not yet ready for. In fact, pediatric occupational therapists report that a large number of preschoolers lack the visual-motor integration skills required for printing, yet are expected to write in small, confined spaces on lines. This expectation can lead to immense frustration, making a child feel like a failure before they’ve even truly begun their writing journey.
When a child resists a tracing worksheet, it’s not defiance; it’s often a signal that the task is developmentally inappropriate. Their hand muscles may not have the stamina to stay on the line, or their visual system may struggle to track the path. Pushing them to complete these tasks can create a negative association with writing, squashing their natural interest in making marks and expressing themselves.
A much more effective approach is to focus on sensory mark-making on a larger scale. Let them trace letters with their fingers in a tray of sand, salt, or shaving cream. This removes the pressure of holding a tool and allows them to feel the shape and direction of the lines with their whole body. Use dot-to-dot activities, which break down complex shapes into manageable steps. Another fantastic alternative is play-doh; rolling, pulling, and shaping the dough is an excellent workout for small muscles. Using cookie cutters to make shapes is a great start, and as dexterity improves, they can press small beads or seeds into the dough to form lines and curves, further developing that all-important pincer grasp.
How to Teach Scissor Safety to a 3-Year-Old Without Fear?
Introducing scissors can feel daunting, but it’s a critical pre-writing activity. The open-close motion of cutting is a powerful workout for the hand muscles needed for writing stamina. The key to a safe and positive introduction is to build the required skills progressively and establish clear, simple safety rules from the very beginning. Never just hand a child a pair of scissors and a piece of paper.
Before ever touching scissors, a child should master the open-shut motion with other tools. Here’s a typical pre-scissor skill sequence:
- Stage 1: Practice the motion with spray bottles during water play or with a turkey baster in the bathtub.
- Stage 2: Use tongs to transfer cotton balls or pom-poms between containers to build control.
- Stage 3: Introduce Play-Doh scissors, which are often plastic and less sharp, to practice cutting long “snakes” of play-doh.
- Stage 4: Progress to cutting something with more resistance, like drinking straws, into small pieces. This creates a satisfying “snip.”
- Stage 5: Finally, move to child-safe scissors for snipping the edges of paper or index cards.
The golden rules of scissor safety are simple: we only cut paper, we always sit down when we cut, and we point the blades down when we walk. For proper grip, teach the “thumb’s up” position (thumb in the small hole, pointing to the ceiling). A great trick is to have them hold a small toy or pom-pom in their armpit, tucking their elbow to their side. This simple action stabilizes the arm and shoulder, promoting better control.
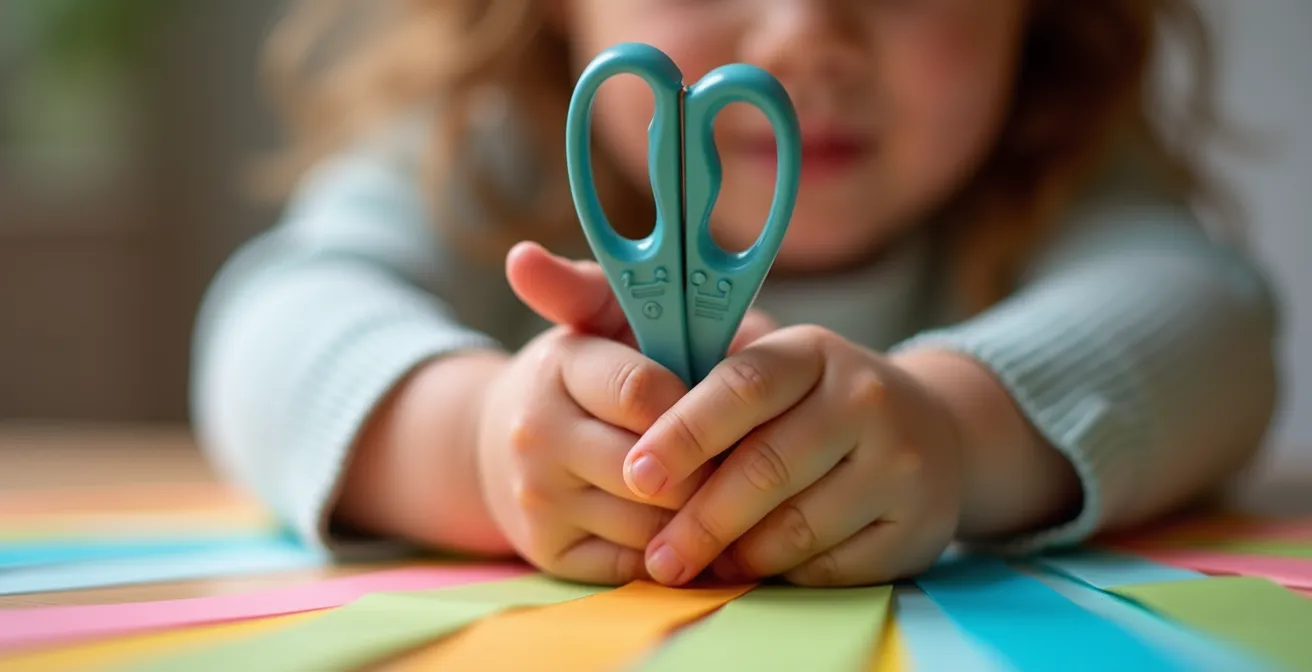
Once they can snip, you can create fun “cutting mazes” by drawing straight, curved, or zig-zag lines on cardstock for them to follow. This activity, suggested by creative educators, turns practice into a game. By introducing scissors through this scaffolded, playful approach, you build competence and confidence, not fear. This prepares them not only for kindergarten crafts but also builds the bilateral coordination (using both hands together) and muscle strength essential for writing.
How to Teach “Milk” and “More” to Reduce Frustration Before Speech?
Communication is a driving force for young children, and the gap between what they want to say and what they are able to say can be a major source of frustration. Teaching simple baby sign language is not only a bridge for pre-verbal communication but is also a fantastic fine motor exercise. Forming signs like “milk” (opening and closing a fist) or “more” (tapping fingertips together) requires the same finger isolation and motor planning that are precursors to writing.
When a toddler can successfully sign for “more” crackers instead of grunting and pointing, they experience a powerful sense of agency. This success positively reinforces their attempts to communicate and can reduce tantrums born of frustration. This connection between physical action and desired outcome is a foundational learning concept. The act of forming a sign is, in essence, a form of expressive writing with the hands. It requires memory, coordination, and the intent to convey meaning—all skills that will be transferred to paper later on.
For children who may have fine motor delays, the mechanical act of both signing and, later, writing can be cumbersome. This is why it’s crucial not to push formal handwriting before a child is ready. The focus for three- and four-year-olds should be on play and building strength through manipulatives, not on worksheet drills. When children can express their needs effectively, whether through early words or signs, their cognitive resources are freed up to focus on exploring the world around them—including the playful activities that naturally build the hand strength they’ll eventually need for school.
Magnetic Tiles vs Wooden Blocks: Which Offers More Creative Possibilities?
Building toys are a powerhouse for fine motor development, but different types of blocks exercise hand muscles in unique ways. Classic wooden blocks and modern magnetic tiles are both excellent choices, but they target different skills and offer distinct creative pathways. Understanding their differences allows you to provide a well-rounded “diet” of play for your child’s developing hands.
Wooden blocks are champions of hand and wrist strength. Lifting, carrying, and carefully stacking heavy blocks builds the larger muscles that support the hand. Success with wooden blocks relies on understanding balance, friction, and gravity, fostering spatial awareness. Magnetic tiles, in contrast, are all about precision. Connecting them requires a careful pincer grasp to align the edges, and their ability to “magically” stick together allows children to explore 2D to 3D visualization and geometric concepts in a way that gravity-bound blocks do not.
The following table compares the developmental benefits of common building toys, highlighting how each contributes differently to fine motor readiness.
| Toy Type | Primary Motor Skill | Secondary Benefits | Best Age Range |
|---|---|---|---|
| Wooden Blocks | Hand/wrist strength through lifting and stacking | Spatial awareness, balance concepts | 2-5 years |
| Magnetic Tiles | Precision pincer grasp for edge connection | 2D to 3D visualization, geometry concepts | 3-6 years |
| Interlocking Blocks (Lego/Duplo) | Bilateral coordination and pressure application | Problem-solving, creativity, persistence | 3-7 years |
Rather than choosing one over the other, it’s best to offer both. You can even use these toys for early letter formation practice. Straight wooden blocks are perfect for building letters like L, T, and H. The curves of magnetic tiles can form a C or S. This turns play into a concrete, tactile experience with the alphabet, long before a pencil is ever involved.
Your Action Plan: Building Letters with Blocks
- Gather Your Tools: Collect a mix of straight wooden blocks and various magnetic tile shapes (squares, triangles).
- Create Boundaries: Use painter’s tape on the floor or a large tray to create a “working box” to practice size consistency.
- Build Straight-Line Letters: Start with simple letters using wooden blocks, like E, F, H, I, L, and T. Say the letter’s name and sound as you build.
- Construct Curved & Diagonal Letters: Use magnetic tiles to form curved letters like C, O, S, and U, and triangular tiles for diagonal letters like A, K, M, V, W, and Z.
- Sort and Cleanup: End the activity by sorting all the blocks back into their bins by shape, reinforcing categorization skills.
Key Takeaways
- Pre-writing success is built on hand strength and dexterity, not premature tracing.
- Everyday play with items like tongs, clothespins, and blocks are powerful fine motor workouts.
- A progressive approach, moving from large-scale movements to precise actions, prevents frustration and builds confidence.
Toy Rotation: How to Foster Deep Play With Fewer Items
In a world of overflowing toy bins, it can seem counter-intuitive that having fewer toys available can lead to better development. However, the practice of toy rotation—periodically swapping out a selection of toys—is a powerful strategy to foster deeper, more meaningful play. When a child is presented with a mountain of options, they tend to flit from one thing to the next, engaging in shallow, fleeting interactions. A limited, curated selection invites them to explore the full potential of each item.
This principle is especially important for fine motor development. When a child has a week to focus on a “fine motor power bin” containing just a few items—perhaps a container of beads, a set of tweezers, and some string—they are more likely to engage in the repetition needed for skill mastery. As early childhood experts emphasize, children can do more for themselves when they have opportunities to practice skills. A rotated toy feels novel and exciting, encouraging the child to practice the same motions of pinching, threading, and manipulating over and over, building muscle memory and endurance.
You don’t need to buy anything special. Many of the best fine motor activities use everyday household items. A “power bin” could contain clothespins and a cardboard box for clipping, a spray bottle and a small plant to water, or an old wallet filled with expired cards to practice pulling things in and out. The key is to limit the choices to encourage focus. By rotating these simple, purposeful activities, you create an environment where your child can achieve deep concentration and make significant gains in their fine motor skills, all while thinking they are just playing.
Now that you have a toolkit of playful, effective strategies, the next step is to start small. Choose one or two activities that you think your child will enjoy and integrate them into your daily routine. Remember that the goal is progress, not perfection. Celebrate the effort and the small victories—the successfully threaded bead, the snipped piece of paper, the tower of blocks that stands tall. By focusing on building these foundational skills through joyful play, you are giving your child the greatest gift: the confidence and physical readiness to become a successful, happy writer.